Buckeyes and Baking

Phew…..Ohio State skated by. I was a little worried at halftime today. We really didn’t sit and watch the game start to finish, but it was on when I was eating out for lunch and we saw the halftime score before heading home. So, I started my baking and watching the game. My baking must have been the magic ticket, as the Bucks started to come back. 😉 Just kidding. I have been wanting to try this recipe from Cooking Light for Walnut Cake with Praline Frosting for a while, so that is on the list to bake today. Also, I have a couple of very ripe bananas, so I made a banana bread for Jon to eat for breakfast this week. I tweaked it a little for fall and added some pumpkin to it….YUM! Speaking of fall, I am getting super excited for pie baking (especially thanks to Whole Foods Bakehouse GF Frozen Pie Crusts; I passed these puppies off to very picky relatives last year with rave reviews), cookie baking and fudge making. Oh, the fudge, can’t wait for the fudge. Not only is there chocolate fudge, but peanut butter too. I can’t decide which I love more. These are recipes that my Grandmother (Dad’s Mom) used to make and when I eat them, I am reminded of her. It makes me smile. 🙂 I am seriously going to have to step up the cardio at the gym come the end of October through my birthday (Jan. 9th for those who are curious), as it will be a 3-month long eating fest.

On to the goods. First I made the banana bread. This recipe was one I found on the forums at Celiac.com and was posted by Sue. Her SIL gave her the recipe and she converted it to a GF recipe and it was a hit! I have made some changes to it. I used Pamela’s baking mix for most of my quick breads & cakes and I didn’t have 1 1/2 cups of bananas, so I used half bananas, half pumpkin. I also used shaved semi-sweet chocolate on top instead of choc olate chips because the last time I put chocolate chips on top, they made my bread sink in those areas. The shaved semi-sweet chocolate seemed to work much better. Jon almost fell out of his chair he loved this so much. The combination of the pumpkin & banana makes this so moist. A lot of times I will add butter to my plain banana nut bread when I eat it, there is no need for anything at all on this bread. Here are some pics and the recipe for the bread:

Banana/Pumpkin Chocolate Chip Bread, pre-baking, pre-chocolate shavings

Banana/Pumpkin Chocolate Chip Bread, pre-baking, after chocolate shavings

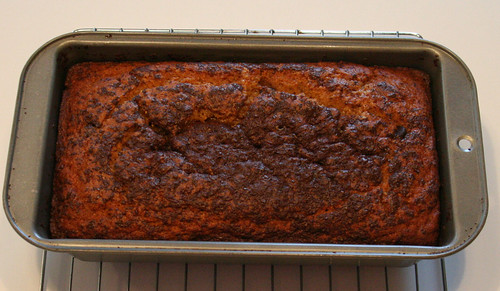
Banana/Pumpkin/Chocolate Chip Bread after baking:


Chocolate Chip Banana Bread

1 3/4 cups rice flour (Or Pamela’s Baking Mix)
1 tsp. baking soda ( only add 3/4 tsp if using Pamela’s)
1/2 tsp. salt
1/4 tsp. baking powder (don’t add any if using Pamela’s)
5 TBSP butter (softened)
1/2 cup granulated sugar
1/2 cup light brown sugar
1 large egg
2 egg whites
1 1/2 cups mashed ripe bananas (about 3 medium) **I did 3/4 cup bananas, 3/4 cup canned pumpkin
1 tsp. vanilla extract
1/2 cup heavy cream **I used whole milk b/c like a dumb a$$ I bought buttermilk, not heavy cream
1 cup semi-sweet chocolate chips, divided **I used about 2/3 cup and did the Baker’s Semi-Sweet Chocolate bar shaved on top
1/2 tsp. xantham gum (omit if using Pamela’s)

1. Preheat oven to 350 F. Coat 9×5 inch loaf pan with crisco, set aside

2. Combine flour, baking soda, salt, and baking powder in medium bowl; stir to mix well.

3. Place butter in large bowl; beat at medium speed until fluffy. Gradually beat in sugars; beat in egg
and egg whites. Reduce speed to low; beat in bananas. Beat in vanilla. Beat in flour mixture in 2
additions alternately with heavy cream. Stir in 3/4 cup of the chocolate chips.

4. Spoon batter into prepared pan; sprinkle with remaining 1/4 chocolate chips (**or chocolate shavings). Bake 55 to 60 minutes
or until wooden toothpick inserted in center comes out clean. Cool 10 minutes on wire rack; remove
from pan and cool completely on wire rack.

Now, onto the Walnut Cake with Praline Frosting. OMG…this cake was truly TDF (to die for). I can’t believe I found the recipe in Cooking Light, of all places. The kids loved it. I can’t say that I blame them. So moist, so sweet, so yummy!! The only thing that I would change next time is to put it in a smaller pan (they call for a 13 x 9 pan, I would almost use and 8 x 11 if you have one), the cake is thinner than the pictures in Cooking Light show, but still super yummy. This is perfect for fall, perfect for company, or just for yourself if you feel like having a treat.

Walnut Cake with Praline Frosting

9 ounces all-purpose flour (about 2 cups) **I used Pamela’s Baking Mix
2 tsp Xanthan Gum (I didn’t use this b/c I used Pamela’s and it has guar gum in it)
½ tsp baking soda
½ tsp salt
7 TBSP butter, softened
1 cup granulated sugar
¼ cup packed brown sugar
2 large eggs
1 large egg white
1 tsp vanilla extract
1 cup 1% low-fat buttermilk
6 TBSP chopped walnuts, toasted
Cooking Spray

Frosting:
½ cup packed brown sugar
6 TBSP 1% low-fat milk, divided
2 TBSP butter
1 TBSP light corn syrup
Dash of salt
2 cups powdered sugar
½ tsp vanilla extract
2 TBSP chopped walnuts, toasted

1. Preheat oven to 350.
2. To prepare cake, weigh or lightly spoon flour into dry measuring cups; level with a knife. Combine flour, baking soda and ½ tsp salt, stirring well with a whisk.
3. Place 7 TBSP butter, 1 cup sugar and ¼ cup brown sugar in a mixing bowl; beat at a med-high speed with a mixer until light & fluffy (about 3 minutes). Add eggs, 1 at a time, beating well after each addition. Beat in egg white. Beat in 1 tsp vanilla. Add flour mixture alternately with buttermilk, beginning & ending with flour mixture. Fold in 6TBSP walnuts. Scrape batter in a 13 x 9 inch pan coated with cooking spray.
4. Bake at 350 for 28 minutes or until wooden pick inserted in center comes out clean. Cool in pan on a wire rack.
5. To prepare frosting, place ½ cup brown sugar, ¼ cup milk, 2 TBSP butter, corn syrup and dash of salt in a saucepan over med-high heat; bring to a boil, stirring occasionally. Cook 2 minutes. Scrape brown sugar mixture into a bowl. Add remaining 2 TBSP milk and powdered sugar; beat with a mixer at high speed 2 minutes or until slightly cooled and thick. Beat in ½ tsp vanilla. Spread frosting in an even layer over cooled cake; sprinkle with 2 TBSP chopped walnuts. Let the cake stand until the frosting sets; cut into squares. Yield: 16 servings. Calories: 306; Fat 9 g; Protein 4 g; Carb 52 g.

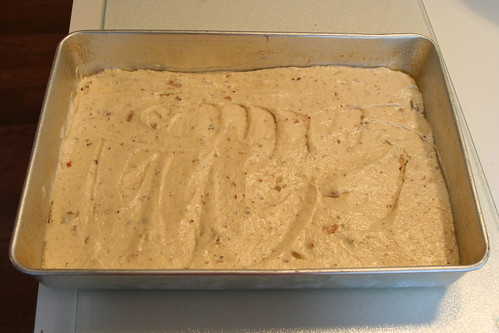
Walnut Cake Pre-baking

Walnut Cake After baking, pre-frosting

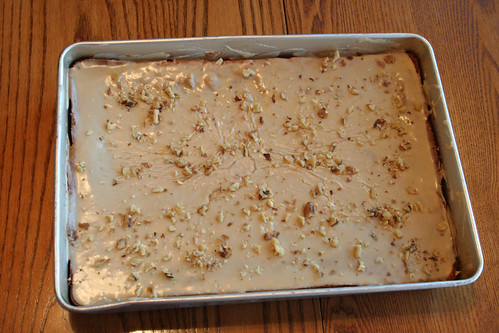
Walnut Cake Frosted (still in pan)

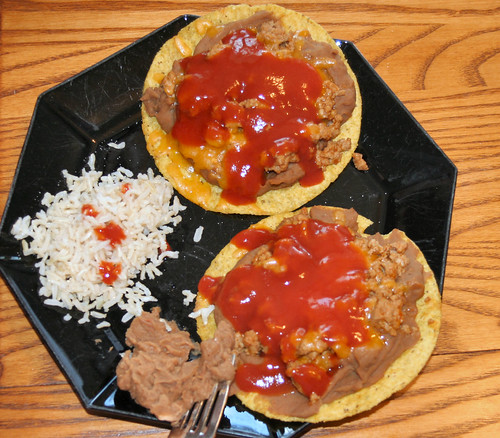
Walnut Cake & Chocolate Chip Banana Pumpkin Bread on my plate:

I am going to post another post with our main course in it. It was a pretty quick go-to meal for Chicken Fettucine Alfredo. YUM! We finished off that meal with the cake & bread.

Marinated Spicy Pork Chops

Tonight for dinner we had Marinated Spicy Pork Chops with baked potatoes, steamed green beans, salad and toasted GF French Rolls with butter from Trader Joe’s. YUM! The pork chops came out wonderfully on the grill. Boy, I am going to miss grilling come winter time! The GF French Rolls from Trader Joe’s weren’t bad. They were horrible room temperature, but heated up in the toaster oven at 350 for 5-8 minutes and then toasted in the toaster oven for a few minutes to brown up, they were pretty good. Not a ton of flavor, but good with butter and with a meal. I can’t see eating these alone, but maybe as a base for a tuna melt, PB & J or something with a lot of flavor. Texture is not bad. Price was under $4. I think they were $3.49 for 4. I split one with Jon.

A picture of the chops:

I used boneless pork loin chops that I had Aaron cut from a boneless pork loin a few weeks back. I have used bone-in chops for this recipe before, though I think I prefer the boneless…they were definitely more tender.

Marinated Spicy Pork Chops**Recipe found on allrecipes.com

3/4 cup soy sauce (La Choy is GF; note ~ you want to use low-sodium here or it will be too salty)
1/4 cup fresh lemon juice
1 tablespoon brown sugar
1 tablespoon chili sauce (I use just under a TBSP of chili powder b/c I didn’t have any sauce)
1/4 teaspoon garlic powder
8 center cut pork chops

1. Whisk together in a bowl the first 5 ingredients. Pour over pork chops and place in fridge to marinate for a minimum of 6 hours, even overnight if you want.

2. Heat up grill and grill for about 6-10 minutes per side, depending on thickness of chop. (as you see in my pic, I cut open my chops to make sure they were done 🙂 ).

3. Serve! Simple, easy & yummy!!

I Come Bearing Treats

I had some errands to run today and while they weren’t super close to Whole Foods & Trader Joe’s, I decided to make them part of my trip. With the cost of gas, I don’t go to those stores as much as I used to. They are about 15 – 20 minutes away and that is too far when you are paying $3.50+/gallon of gas and drive a mini-van. I always go into these places excited to see what kinds of new, fun GF treats they have. Most of the time I come out close to empty handed. This happens for a few reasons. First, I tend to overstock. You certainly won’t go hungry in my house. Second, the item or treat is a great idea and looks good, but then I rationalize that for less $$, I can make the same thing and it will most likely taste even better than what is sitting right in front of me; this is where I get some of my baking & cooking inspiration. Third, the stuff is just too dang expensive!

My first stop was Trader Joe’s. I always hit their bread section first hoping for some kind of miracle, but never find anything that comes close to my beloved Pamela’s Wheat Free Bread. I did pick up some GF French Rolls that Jon and I will toast and have with our dinner tonight. I’ll let you know how that goes. I am not overly optimistic. I usually make Chebe Foccacia or homemade corn bread if we want bread. I was just thinking of the convenience factor b/c I have a meeting at school tonight. As I was walking along, I came across the sample stand and they were sampling Fage Greek Yogurt and Trader Joe’s Gluten-Free Granola. I picked up a cup…YUM!! The granola was really good. I believe that it is $3.49 per package, pretty reasonable compared to the stuff I bought last week, Enjoy Life for $4.99, same size. The Fage was also really good, but very expensive. I passed, since yogurt and I are not getting along lately. I picked up some GF pasta, can’t let that stock get low when it is $1.99/package at TJ’s. Much cheaper than other places in Columbus. Then in the frozen food aisle, I stumbled upon some Chocolate Meringue cookies. They say “no gluten ingredients” right on them. They were under $3. I took a chance. Even though I love the baked goods I make, I had to give these a try, as I have never even tempted to make meringue anything. Maybe that is one thing to add to my list of must try in 2009. I will put that right up there with making homemade cinnamon rolls. 🙂 So I had a couple of the cookies after lunch…OMG….I was very impressed!! They are a little on the sweet side, but hey, that is why I was eating a cookie, b/c I wanted something sweet! They are low in fat and only have 30 calories per cookie! The box says the serving size is 4 (I love when they have larger serving sizes, then I don’t feel like such a pig!). I would say these are a definite buy again treat. Here is a picture of the box:

I was also looking for Lara Bars while on my excursion today. I usually by the Jocalat ones in bulk online, but my other favs are cheaper to buy in local stores when on sale. Trader Joe’s used to have a pretty decent selection, not so much today. They had 4 different ones to choose from and none really jumped out and said “Buy me!” They had apple pie (yuck), cherry pie (yuck), chocolate (have a bunch) and pistachio (don’t like pistachios at all). I guess I will stick to buying them at Raisin Rack where they have about 15 different kinds to choose from.

On to Whole Foods. This store is just amazing. It is almost overwhelming with all the different sights and smells. I could spend days walking up and down the aisles. My Dad and his friends call it “Whole Paycheck” b/c it is so expensive…LOL! I started in the produce section and picked up some beautiful, local, heirloom tomatoes. YUM! I grabbed some goat’s milk yogurt (marked gluten-free right on the container) since real yogurt has been bothering my stomach lately. BTW, if this doesn’t work, I give up on yogurt, and I really love it! Then I came across some Envirokidz Crispy Rice Bars. I have had the chocolate, berry and PB ones before, but they have a new flavor out……Peanut Choco Drizzle. OMG! I love the new Leapin Lemur Peanut Butter & Chocolate cereal, so I figured these would rock too. Boy, was I right!!! They are just the right amount of peanut butter and even have peanuts in the bar! The chocolate is just right on top, a drizzle, not a coating. These were not cheap (and not on sale like the other Envirokidz bars) at $4.99 for 6 bars, but I had to give them a try. Now, I must hide them from Jon….LOL! Just kidding!

When I got home from my outing, I was starving. I made myself a wrap with a Food for Life Brown Rice Tortilla. I put in some heirloom tomatoes, turkey, swiss cheese, spinach & Frank’s Red Hot. I had some sauteed spinach & blue corn chips along side. Oh, and don’t mind the rip in the tortilla. These normally don’t rip very easily, but someone had crinkled it up in the fridge in the way back. Wonder who that could have been??

Off to make dinner now.

Celiac, Celiac, all around.

Just a quick note here…..Jon comes home from school today and tells me that in his advisory class (home room in the “old” days), his teacher has Celiac and is gluten-free, as is another girl in the class!! OMG! Talk about a small world! Both he and I wonder if they put the 2 kids in the same class on purpose or if it is just a coincidence?? I did know that there were several other kids in his middle school that had Celiac, but never thought that he would find out who. The school is pretty big.

Well, at least now if they have parties involving food, things will be a little easier. Maybe I can get with the teacher and this other childs Mom to set stuff up.

Mooooommmmm…come on….not the broccoli slaw!!!!

This is the phrase I hear from my son, Jon, yesterday morning after packing his lunch for school. Every morning he comes down from showering, asks me to make him breakfast and what I packed him for lunch. Usually it is the same type of thing….sandwich on GF bread, chips, applesauce, yogurt, drink, dessert (if I have made treats lately). Well yesterday I gave him the rest of the broccoli slaw that we had with dinner the other night. He really liked it and even mentioned how much the dressing tasted like his favorite dressing that I buy for him from a local restaurant. What he didn’t mention that he was only going to like this dish at home, not at school. Apparently now in addition to his gluten-free food restrictions there are also “coolness factor” restrictions. I guess it is bad enough that he has to bring his lunch to school when 97% of the kids buy, but then to show up with broccoli slaw, well, that is just SO UN-COOL! Now, when I pack his lunch in the AM, I normally aim for nutritionally balanced, not “coolness factor” balanced. This is where I have been getting it wrong. He tried to throw the slaw back into the fridge; I put it back in his lunch box. The container came home empty…anyone want to place bets on whether or not he actually ate it? My guess would be that once it showed up in plain view in his lunch box, he might as well have eaten it. Throwing it out at that point would have only served one purpose, to make me mad (and if I don’t know, how can I be mad?). Going hungry, or partially hungry is probably an option a 12-year old boy would choose over eating the broccoli slaw. So I brought this up to Aaron, who looked at me like I had 2 heads when I told him that I packed the broccoli slaw for Jon, and he couldn’t believe that I would pack it for him for school. He went on to say that I was calling attention to his already “different” needs, saying that it is bad enough he has to pack every day to eat safely, but then I had to throw in the good ole broccoli slaw on top of it. Okay, maybe the broccoli slaw was taking it a little too far. Who can blame a Mom for wanting to make sure her kids eat healthy? Apparently we will be sticking to applesauce or grapes for lunch and extra fruits & veggies at home for snacks and meals to make up for what he is missing at lunch. I do pack Lara Bars (they count as a fruit!), but he doesn’t always have room for one after his sandwich and other stuff. I make sure he has one every day in case he gets hungry, if he eats it, I replace it, if not it just stays in the lunchbox.

So, tomorrow, do I pack the roasted brussel sprouts or spinach salad for Jon for lunch? LOL! Just kidding.

Chicken Tenders & Kit Kat Bars

No, I didn’t eat them together. 😉 Last week I had planned on making Chicken Tenders, but they got bumped from the menu for Sushi instead. So, tonight was Chicken Tender night. I made the best dessert that I found on the forum at www.celiac.com and slightly modified it. It ended up tasting just like a Kit Kat bar, but gluten-free.

Here is a picture of the chicken tenders with fried potatoes (leftover from last night’s breakfast for dinner) and broccoli and a salad. I probably could have baked the chicken a tad longer to get the tenders a little more golden, but we were hungry and the chicken was done inside.

Chicken Tenders
**Recipe Courtesy of my sister, Kelly. I think she got it from the Bisquick Box

3 chicken breasts (cut crosswise into ½ inch strips)

2/3 cup of Bisquick (or Pamela’s baking mix)

½ cup Parmesan cheese

½ tsp salt or garlic salt (I used garlic powder and then 1/2 tsp. salt)

½ tsp paprika

1 egg, slightly beaten

3 tbsp butter, melted (I used Pam sprayed on the chicken instead)

Heat oven to 450. Line cookie sheet with foil and spray with cooking spray. Mix Bisquick, cheese, salt and paprika in ziplock bag. Dip chicken in egg and then place in bag to coat. Arrange in single layer on cookie sheet and drizzle with butter (I sprayed butter-flavored Pam on it instead). Bake 12-14 minutes, turning over half way through. Chicken strips should be golden brown when finished. Serve with honey mustard and enjoy!

Honey Mustard
3-4 TBSP Helmann’s Canola Mayonnaise
1 TBSP Grey Poupon
1 tsp Spicy Brown Mustard
1/2 tsp yellow mustard
1 TBSP, maybe 2 TBSP Honey
Frank’s Red Hot to taste

I always play around with the amounts to my specific taste. This is a thicker honey mustard, perfect for dipping.

Now, the original recipe for these cereal type bars calls for either nuts, raisins, seeds, some healthier options than 2 cups of chocolate chips. Having the picky kids that I do, I didn’t have anything else (except GF Oats) on hand to throw in for this spur-of-the-moment recipe. So, I threw in 2 cups of chocolate chips. YUM!! So this is really more like a dessert/candy bar.

Chocolate Peanut Butter Cereal Kit Kat Bars

3 cups cereal (I used 2 cups Rice Chex (now GF) and 1 cup Corn Chex (Health Valley))
2 cups add-ins (seeds, raisins, nuts, chocolate chips, oats); I used 2 cups chocolate chips

1/2 cup corn syrup
1/4 cup brown sugar
1/4 cup white sugar
3/4 cup peanut butter (or other nut butter)
dash of vanilla

1. Mix cereal & add-ins in a large bowl. Line cookie sheet with foil and spray with Pam.
2. Heat corn syrup and sugars in a pan over medium heat until sugar has dissolved completely. Be careful not to burn.
3. Remove from heat and add peanut butter and vanilla until melted and smooth.
4. Pour peanut butter mixture into cereal & add-ins and mix well.
5. Press into pan/cookie sheet and let cool.
6. Cut into bars/squares.
7. Enjoy!!

**My cookie sheet was way too big, so I only used part of it. You could also double the recipe to make more.

Cut into squares to store:

What a wonderful end to a great dinner! Thank goodness we saved calories by baking those chicken fingers instead of frying them, because we just made up for them with the dessert!

The Non-Traditional Labor Day Meal

When you think of Memorial Day, Fourth of July or Labor Day meals, you probably think of some kind of food cooked on the grill. Burgers, brats, ribs, chicken, kebobs, something along those lines. We have done a lot of that over the summer, so I opted for Breakfast for Dinner for our Labor Day meal. My kids love when we have breakfast for dinner. So do I, for that matter. I don’t know why, but breakfast tastes so much better when you eat it for dinner, you know exactly what I mean, admit it! Maybe it is because I don’t eat eggs, bacon, potatoes, pancakes, etc for my daily breakfast. I eat brown rice cakes with PB & J and fresh fruit usually. So on tonight’s menu I had bacon, fried potatoes, toast, omelets, fresh fruit and a surprise for my Jon-Jon and Hannah (really more for Jon-Jon, Hannah was just along for the ride since she isn’t restricted to a gluten-free diet). I had some Pamela’s Wheat Free Bread in the fridge and I decided to surprise Jon and make him Gluten-free French Toast with it! I had never made it GF before, but I figured it couldn’t be all that different from making it with gluten-filled bread. Here is the way I did it:

Gluten-Free French Toast

2 eggs, lightly beaten
Dash of 1% low-fat milk
Dash of cinnamon or nutmeg, your preference
2 pieces GF bread (I used Pamela’s Amazing Wheat Free)
Powdered Sugar
Syrup (We use Aunt Jemima)

1. Dip bread into egg mixture.
2. Place bread in heated frying pan or griddle over medium heat.
3. Cook 3-5 minutes per side (check to make sure you aren’t burning it….it should get nice & brown)
4. Remove from pan and top with powdered sugar & syrup.

Picture of the GF French Toast (before the syrup and after the powdered sugar)

Jon was very surprised and said that he didn’t like it, he LOVED it!!! He wants it every day for breakfast now. (What the heck was I thinking? I just made more work for myself every morning?!?) He had some bacon and fried potatoes along with his new-found breakfast for dinner love.

I did make Hannah some French Toast too, but I did hers after Jon’s and used regular bread for her. She saved one of her pieces for breakfast tomorrow. She voted Mommy’s French Toast better than her frozen Eggo Waffle French Toast Sticks (what an honor 😉 ).

I had a spinach, bacon & mushroom omelet, toast & butter (Pamela’s), fried potatoes, 1 slice of bacon and some Edy’s Dibs (oops….I missed out on my fruit b/c the darn Edy’s Dibs were calling my name!). On a side note, love that the Dibs are GF. I love the chocolate covered chocolate. They are only 15 calories each, serving size is 28!!!!! HEL-LO!!! I just like to eat a few at a time for a sweet treat.

Mexican Pizzas & Rice

Mexican Pizzas are a quick go-to dinner for me. I end up making these on nights when we have lots going on…meetings at school, hockey practice, swimming lessons, etc. I can get these ready in a matter of 30 minutes or less (not counting the rice, you can make this earlier and reheat). I usually prefer to use ground turkey for the meat, but occasionally will use ground beef if the ground turkey isn’t on sale. The rice is based on a recipe that my Mom used to make when I was a child. I have modified it a bit for us b/c my stomach can’t tolerate onions.

Mexican Rice

1 cup brown basmati or jasmine rice
2-3 tsp EVOO
3 cloves garlic
1/2 onion (I omit this b/c I can’t eat them)
1 large tomato
chicken broth
cumin
chili powder
red hot
salt
pepper

1. Drop tomato into boiling water for 60 seconds. Remove tomato from water and then remove the skin. Careful not to burn yourself as I have done too many times when I am in a hurry. 😉
2. Chop tomato, peel garlic, chop onion and place all ingredients in a food processor/blender. Puree until everything is liquid. Add cumin (about 1 tsp), chili powder (1/2 – 1 tsp), red hot (I like a lot, but use your own judgement), S & P. Blend.
3. Place EVOO and rice in a 2 qt. sauce pan and warm over med to med-high heat. Brown rice, but don’t burn it.
4. Dump tomato mixture into a glass measuring cup and then add chicken broth to equal 2 cups of liquid. Dump your 2 cups of liquid into the rice; stir and bring to a boil.
5. Stir and reduce heat to simmer for 40-50 minutes, depending on what kind of rice you are using.
6. Remove from heat and let stand for 10 minutes. Fluff with a fork & serve.

You can either now serve this or put away in the fridge and then reheat for dinner.

Mexican Pizzas

1 lb. ground beef or turkey
Packet of Taco Seasoning (I use the bulk Ortega)
1-2 cans of refried beans (I used La Preferida)
Tostada shells (I use Ortega)
Cheddar Cheese
Lettuce
Tomato
Taco Sauce
Salsa
Sour Cream
Any other toppings you would like

1. Brown ground meat in a pan. Add taco seasoning.
2. Preheat oven to 350.
3. Warm beans in a pan on the stove or in micro.
4. Heat tostadas on a cookie sheet in the oven for 3-5 minutes or until hot.
5. Top shells with beans, meat & cheese.
6. Return to oven until cheese is all melted and bubbly.
7. Top with favorite toppings and serve!

Here are some pictures of our meal. Jon likes to drown his in taco sauce (Ortega Mild). I prefer to top mine with lettuce & tomato and Frank’s Red Hot). **Seems Jon added some extra beans to his plate as well. 😉

This is one of the kids favorite meals and is super easy to make.

Related Posts with Thumbnails